Background:
Starting off from the Lego WeDo 2.0 car project, the main purpose of this project was to construct an improved Lego WeDo 2.0 car which can be steered with an Android phone or tablet with Bluetooth Low Energy capabilities – a.k.a: BLE. However, I quickly found some limitations: the Lego WeDo 2.0 app from Lego was only available for tablets and not phones; there also wasn’t an easy interface like a simulated joy stick as in the EV3 app…you had to make due with their limited “blocky” code they developed especially for Lego WeDo 2.0 programming (fun and easy for kids…not much for making smarter robots though).
So, since there was no decent app for Lego WeDo 2.0, I decided I would make one. My main inspiration came from the work of another Lego inspired blogger “Major Alvega” who did the most of the ground work here: Ofalcao.pt/blog. He actually did the work of discovering the Lego WeDo 2.0 BLE control codes using a combination of BLE sniffing and some hands-on reverse engineering. Additionally, he did the work of creating the first MIT App Inventor App for the Lego WeDo 2.0, from which all of this project is based. Check out his site for a better explanation of the story than I can give.
Quick Links:
If you want to jump ahead to the finished app, get it from Google Play here:
Google Play: Tilt To Drive App for Lego WeDo2
Note: if you wonder why I specify “Lego WeDo 2.0”, it is because its predecessor the “Lego WeDo” is a different platform which is controlled via a USB connection. The motor/sensor connections are completely different and not compatible at all with the Lego WeDo 2.0 set. In fact, the Lego WeDo (1.0 let’s say) was essentially chained to your desk by a USB cable and couldn’t live much beyond the edge of the desk or your laptop. Lego WeDo 2.0 changed that with the use of BLE which allowed you to roam free (also to note here…the standard Lego WeDo 2.0 Education Kit comes with only a Smart Hub, 1 motor, 1 tilt sensor and 1 proximity sensor. I had to buy the second motor separately).
Hardware:
The hardware requirements are:
- Android phone or tablet with BLE compatibility (essentially Bluetooth 4.0 or better; if you’re in doubt, there are may “BLE checker” apps on Google Play to verify this; one example: Google Play BLE checker ). In my testing, I used my Samsung S6 phone and my Samsung Galaxy Tab A 10″ (2016). Also, I tested this on my Samsung Galaxy Note 10″ (2014). All of them worked fine
- Lego WeDo 2.0 Smart hub
- 2 x Lego WeDo 2.0 motors
- Various Lego parts to construct a skid steer car: 2 large wheels, axles, beams, gears or pulleys, a caster wheel construction (see picture)
The Lego WeDo 2.0 car “TiltToDrive” app is targeted for a Lego WeDo 2.0 car using a skid steer (tank style) motor arrangement. For this, you can use my design if you like, or make your own. Basically, it requires 2 independently driven wheels (1 motor for each wheel) and a caster wheel at the front or back.
On the control side, you will require a BLE compatible Android phone or tablet. If you’re in doubt, use the BLE checker app given above. If you’re already using the Lego WeDo 2.0 app from Lego, then don’t worry, your device should be fine.
Software:
In this project, the goal is to build the software yourself. Now I’ve tried my hand at the Android SDK in its various incarnations, but mostly you spend your time building resource files to make the compiler happy. It’s not that much fun really, or straight forward. A much better platform for bringing back the fun is the MIT App Inventor 2. This platform was designed by Google, and eventually given to MIT for further development. Anyway, here all you need is a Google+ account. There’s some handy tutorials to get you started, so I’ll leave you to that. In the end, you’ll need to test your app directly on the phone/tablet, since BLE isn’t handled by the emulator.
At the time of this writing, the BLE extension for App Inventor was still experimental. This requires that you download the BLE extension from the MIT extension repository (.aix file), and then upload it to the App Inventor console (web-based). Additionally, since the extension is still “experimental”, it’s not possible to include the .aia file in the App Inventor Gallery as of this writing (January 2017). For this, you’ll either have to use the blocky graphics below to reconstruct it from scratch, or I might place this in a Git directory. I’ll update the blog if I get around to it, if I make the Git directory but I’d prefer that MIT to allows the app .aia file with extension in the app gallery instead…let’s see which happens first.
Construction:
Construction of the Lego Skid-Steer Car:
Now here, my directions are quite approximate. I honestly didn’t spend more than 2 hours working on the car itself; my main intent was to provide a chassis for the WeDo2 motors and Smart hub in order to test the programming/algorithmic side of the project. However, my aim was to make it better than the v1.0 of the WeDo2 car from the last post. Here, I noted a few things:
- A skid-steer arrangement is easier to work with for programmable driving (each motor controls a wheel: forward = both motors same speed, turn=one wheel is slower than the other, spin=both wheels turn in opposite directions)
- Additionally, the WeDo2 motors do not have a step or timing control, so controlling them is only power level + rotation direction.
- Gears work much better than pulleys. They provide a more solid connection with the wheel.
- Caster wheels need to have a bias direction…meaning that they are free to rotate but will align themselves with the direction of the travel…much like a flag flaps in the direction of the wind. This requires the rotation axis of the axle to be offset from the vertical swivel axis. If they ware both in the same plane, it might work for a while, but you’ll get lockup eventually.
Here’s some pictures to guide you. I’m sure you can come up with some upgrades here:


Figure 1: Lego WeDo 2 car construction
App Development:
Getting Started:
In here, first a little background regarding the app. As I mentioned earlier, developing an Android app used to be a bit cumbersome, with all of the Eclipse installation, emulator setup, Java setup and resource files…really, a bit more trouble than its worth for a simple app. So, along comes the inspiration for the MIT App Inventor 2, which makes app development more like a game with drag-and-drop instead of a lot of typing. To get started, you’ll need a Google account. Start off here, and watch a couple of tutorials. This will show the most important fields, like which is the “Designer” and which is the “Blocks” mode.
After you get the main ideas down, check out the Lego EV3 tutorial. This is the basis for the design of this project. Just to note: I couldn’t actually get the EV3 tutorial to work with my EV3 robot. The app extensions for the EV3 motors didn’t seem to work and it wouldn’t connect with the EV3 brick via Bluetooth. Eventually, I just gave up because there’s a dozen other ways to get control of your EV3 robot, and the code/platforms here are numerous. Anyway, just get the accelerometer portion from this app…this is all that is important. I started by copying the app from the tutorial and deleting all of the EV3 stuff.
Using the Bluetooth Low Energy Extension:
In order to connect with the Smart Hub, you’ll need to add the “BluetoothLE” extension from the MIT App Inventor Extension site. Here, you simply download the .aix file to your computer, and then upload it again into your app project “Extensions” section. Then drag-and-drop the BLE widget into your designer screen, and it will be added to the project. For more explanation on the differences and techniques associated with Bluetooth, see the further elaboration below.
Side note on Classic Bluetooth, BLE, and Sniffing vs. Scanning:
A bit of background on Bluetooth…as I am no expert on Bluetooth technology, I’ll keep this short and to the points which mattered to me to make things work.
Classic Bluetooth: most older devices (prior to Bluetooth v4.0) use this protocol. It used more complicated, less structured format for communication which could vary greatly from device to device. Additionally, it requires an almost constant connection between the devices to maintain stability and therefore has a high power consumption. The EV3 Lego series still uses this protocol along with a great deal of existing periphery hardware out there.
Bluetooth Low Energy (BLE): an advanced Bluetooth protocol (v4.0 and greater) which main focus was on standardized communication (via “advertisements”) and low power consumption. This was targeted for the up-and-coming Internet-of-Things (IoT) era in devices big and small would join the online world. Here, the goal was to create a protocol with very low power consumption such that devices could communicate and last on a single charge for days or weeks (depending upon the battery, requirements, etc.) The protocol advancements (BLE v4.1 – 4.2) essentially drive for lower power consumption but with increased communication speed.
BLE Sniffing: the term “sniffing” refers to essentially intercepting the BLE communications between two connected devices with a third devices….in other words, eavesdropping on their conversation. In order to do this, you need a special piece of hardware such as a USB Sniffer tool — an example such as the AdaFruit “Bluefruit” BLE sniffer can be gotten here ( ~ $35 on Amazon.com: AdaFruit Bluefruit LE Sniffer ). The advantage here is that you can detect the actual protocols being used between two devices which know how to communicate with each other. However, it’s not all free sailing here…you need to further probe the target device via scanning to discover its capabilities.
BLE scanning: scanning, in this sense, essentially means connecting to the target BLE appliance with a PC, tablet, or phone in order to issue and read commands from the device directly. Here, you are given only a set of interface addresses (called UUIDs) to which you can either read or write data, or attach a notifier service. In order to find the command codes, you need to dig harder and perhaps use a sniffer. Of course, having a little information, you can get a long way. For For Linux, you can use the “gattool” to read and write commands to a connected BLE device. Or, you can try a simple Android app like BLE Scanner from the Google Play to get the main UUIDs for a device. I won’t elaborate more here…check out the Major Alvega blog posting on this topic for BLE reverse engineering: Ofalcao.pt Lego WeDo2.0 Reverse Engineering
GUI Interface Layout (“Designer” mode)
Now that you’ve gotten your MIT App Inventor account setup and tried a few tutorials, it’s time to get started with the “Tilt to Drive” app. Below is a graphic of the layout:

As you can see above, the layout consists mainly of a number of buttons, labels, check boxes and slider components. All of these can be found in the standard Layout section of the App Inventor interface. The non-visible components, as noted at the bottom of the graphic, must also be added. Notably, the “BluetoothLE1” widget is added from the “extensions” selection. However, prior to that, you must have uploaded the MIT Bluetooth LE extension into your designer session (see section above). Note: the “Classic Bluetooth” client is also required only as a dummy extension if you would like to build the app to an .apk for distribution to others or for permanent installation on your device. This is mainly a trick to force the Android permissions required to support Bluetooth via the classic client (the Bluetooth LE extension does not force them at this point). The classic Bluetooth client is not used in the app however.
Blocky: Complete Blocky overview
The complete blocky code is given in the graphic below. It is too small to see here, but if you download the graphic, all elements should be visible. Further explanation is given in the following sections (click here for the downloadable image)

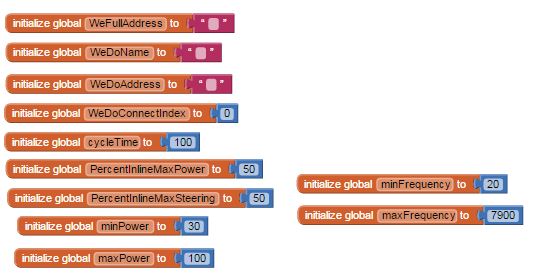
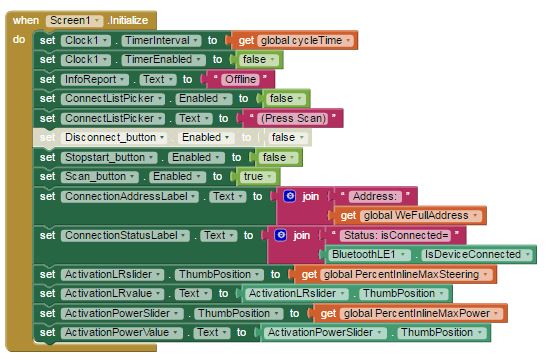
Blocky: “Connection & Button” section
The following section details the buttons, sliders, and events which occur in the app. Note: items shown in grey are disabled components which were used for debugging purposes. The global variables are defined as below:


Blocky: “Clock1.Timer Event”
The aspects of the Clock1.Timer loop are shown below. This loop only executes when the Clock1 timer is enabled. This event is triggered every 100 milliseconds, as currently defined by the global variable “cycleTime”. Essentially, this loop polls the accelerometer values and casts them into the required motor power levels and LED color if requested. The reduction of the values is carried out by the helper functions, as detailed in the next sections. Note: the greyed sectioned of code for the “WeDo2Piezo” is disabled, as it was not possible to make it function with the current arrangement. Perhaps further development is left to the student…as they would say in the old engineering classes. Some further hints might be found on the Ofalcao.pt/blog “playing sound”

Blocky: LED control variables & blocks
In the following graphic, the details of the LED control block are described. There is a possibility of 11 different settings for LED, so this was just as easy to transform into a lookup table for either integers or text. The descriptions of the code and the hex code is described by the Ofalcao.pt/blog “colors” blog. All codes here were pre-computed in hex, reversed, and cast to base10. Read the Ofalcao blog for further details on this:

Blocky: Motor Control Blocks
The following graphic describes the motor control block. The details of the motor control were described further by Major Alvega in his related WeDo 2.0 posting for the EV3Dev. In short, the motor command requires the same service_UUID and characteristic_UUID as before, with the command value set to a 4 byte code (values in hex):
- byte 1: 01 = port 1 ; 02 = port 2
- byte 2: 01 = command for motor speed (there is only 1 command possible for motors)
- byte 3: 01 = length in bytes of the next command (which is always just 1 byte)
- byte 4: 00 to 64 (0 to 100 in decimal) for forward power; FF to 9C (255 to 156 decimal) for reverse power (255 = 0 power in negative)
The bytes are packed, reversed, and cast to base10 for communicating with the Smart hub.

Blocky: Helper procedures
In order to accomplish the intermediate reduction tasks (conversion from the the accelerometer values to the motor power levels, for instance), the following helper functions were defined:

MapToRange procedure:
Essentially, this scales inputs in one linear system to another via the simple equations of a line: y-y0 = (x-x0)*(y1-y0)/(x1-x0)
ClampReal/ClampInt procedure:
Given an input, constrains to be between min and max specified. The ClampInt procedure simply truncates the value to an integer via the ‘floor’ function. This is necessary to before conversion of base10 to hex.
ReverseBytes procedure:
Given a string value ‘hexin’ of the specified bytes, reverse the string in a 2 character patter to reverse the byte order. Output is again a string representing the reversed bytes in hex.
PadWord procedure:
Given a ‘hexin’ value of variable length (1 to 4 bytes), it adds leading 0s to the string to make it a 4 byte word. This procedure was used with the WeDo2Piezo procedure, to pad frequency values to 4 bytes…however, never used as the Piezo portion of the code was deactivated.
Final Words:
The app, as detailed here, should provide a good starting point for others trying to do the same with Lego WeDo 2.0, or other BLE projects. It’s unfortunate that the MIT App Inventor isn’t able to host the .aia code just yet (because of the BLE extension), but I hope to update this in the near future when it becomes available.
My future plans, if I get ambitious, is to continue along these lines with motor control (for EV3 or WeDo2), but integrate this with computer vision. This will probably try to implement via Android or Raspberry Pi; the RPi is a bit easier to get up-and-running with Linux and Python than it is to build full apps with the Android SDK. Keep tuned for future posts…

Wow, great post! Very nice work with Blocky. Perhaps you could use it with the new LEGO Boost announced todat at CES, it’s basically a WeDo 2 on-steroids.
Also thanks for quoting me, I appreciate.
LikeLike
Thanks! I’ll have to check more into the LEGO Boost…sounds interesting. For this month, I’ve got to get our FLL Junior team ready for our presentation in the next few weeks. I’m looking forward to seeing the bigger FLL presentations and competitions too. There’s not a big Lego robotics league presence in my part of Switzerland, but I’m trying to generate more in the area. Keep up the great blogging!
LikeLike
Hi nicely done. scratch is not connecting with our we do kit even after replaced with ble 4.0. but your app is connecting. can you share your aia file
LikeLike
Sorry, my previous reply missed the mark. The Scratch-to-WeDo communication requires this special BLE dongle for your computer..it’s not just an ordinary Blue Tooth 4.0 dongle you can buy from any electonics store. It has special developer options and may require you to install the drivers from their website.
As for the Android app, I’ll try to sent the .aia file later today.
LikeLike
Hi I solved my problem but could you share me your BLE extension? I’m sure that the BLE extension on AppInventor site is totally different with yours. 🙂
LikeLike
Hi,
Glad you got it to work! I’ll try to send you the BLE extension I used or just the whole .aia and you can extract it. Most likely, you do have the newer version of the extension…mine was from about Dec 2016 from the MIT app inventor extension page.
LikeLike
Hi,
A great posting! I tried to download the app from Play store but it’s not available anymore. Would it be possible for you to send the .aia file to me via e-mail? Thanks for your great work!
LikeLike
Hi,
Sure I could send the .aia file. I had to take the listing off the app-store because Google said it infringed on the Lego name trademark 😐
Can you send me your email address, and I will try mailing the file? It’s been some time since I’ve looked at this app, so it might take some time to find it again.
Thanks,
RexBarker
LikeLike
Better yet, I’ll try making a Dropbox public folder so you can download it from there. I’ll post it back here when I get a chance (…i.e. probably give me a few days 😉
LikeLike
Sorry for the late reply. If you’re still looking for the app, I created Git hub repo for it here:
https://github.com/RexBarker/TiltToDrive
LikeLike
Hi there,
I am new to this app. Please could you provide an APK file which works. Your help is highly appreciated as my son is very keen to play with the WEDo set.
Thanks,
Asif
LikeLike
Hi Asif,
It has been some time since I checked this App. I no longer have the APK of this project, I believe. I had to remove the posting from Google play, as they said it infringed some Lego name trademark 😦
You can try rebuilding the app with App Inventor again. Check my git hub repository for the files (https://github.com/RexBarker/TiltToDrive)
I am not sure about the current workability of the BLE extension at this point. It was replaced sometime ago, and the interface might need re-working to function with this new extension. I have included the original extension in my repository.
Best of luck!
Rex
LikeLike
Hi Rex,
Good to hear from you. Unfortunately I am all new to app programming etc. I really liked your YouTube video and to my amazement of using a phone to control a car.
Will keep an eye in case you reprogram the app.
Keep up with your good work!
Asif
LikeLike
Hi Rex,
Finally managed to put the app together to be able to control a WeDo car.
I am sending the file (via your email), the full and completed code. I hope it helps others in the same path.
Regards,
Asif
LikeLike
Sorry I realised it was wordpress email, so I am requesting your email in case you may be interested in the app. Thanks
LikeLike